Craft Your Own Statement Earrings: Unique DIY Techniques
Beadwork Techniques for Earrings
Crafting beaded earrings involves an array of techniques that enhance creativity and craftsmanship. This section explores methods to create intricate beaded patterns and ways to secure them using jump rings.
Creating Beaded Patterns
Pattern design is a crucial aspect of making beaded earrings. Crafters often start by selecting beads of various shapes, sizes, and colors to form unique designs that reflect personal style. Common patterns include geometric shapes, floral designs, or abstract configurations. Each pattern requires attention to detail and symmetry to ensure aesthetically pleasing results.
Once beads are selected, they are strung together using needle and thread. Some designs may involve weaving beads in intricate patterns, which requires precision and patience. It is essential to keep the tension consistent to prevent warping and to maintain the integrity of the design. Experimentation with bead placement and color schemes can yield innovative results.
Securing Beads with Jump Rings
Jump rings play a vital role in the assembly of beaded earrings. These small metal loops connect the beaded sections securely to the earring hooks. To properly secure beads, jump rings should be opened using pliers, avoiding any distortion to their circular shape. The beads are threaded onto the ring before it is carefully closed to ensure a tight hold.
For added security, a double-ring technique can be employed where two jump rings are linked, minimizing the risk of beads slipping off. This method also enhances durability and adds an extra layer of design complexity. Ensuring that jump rings are of appropriate size and strength is crucial for supporting the weight of beads without compromising comfort.
Making Resin Statement Earrings
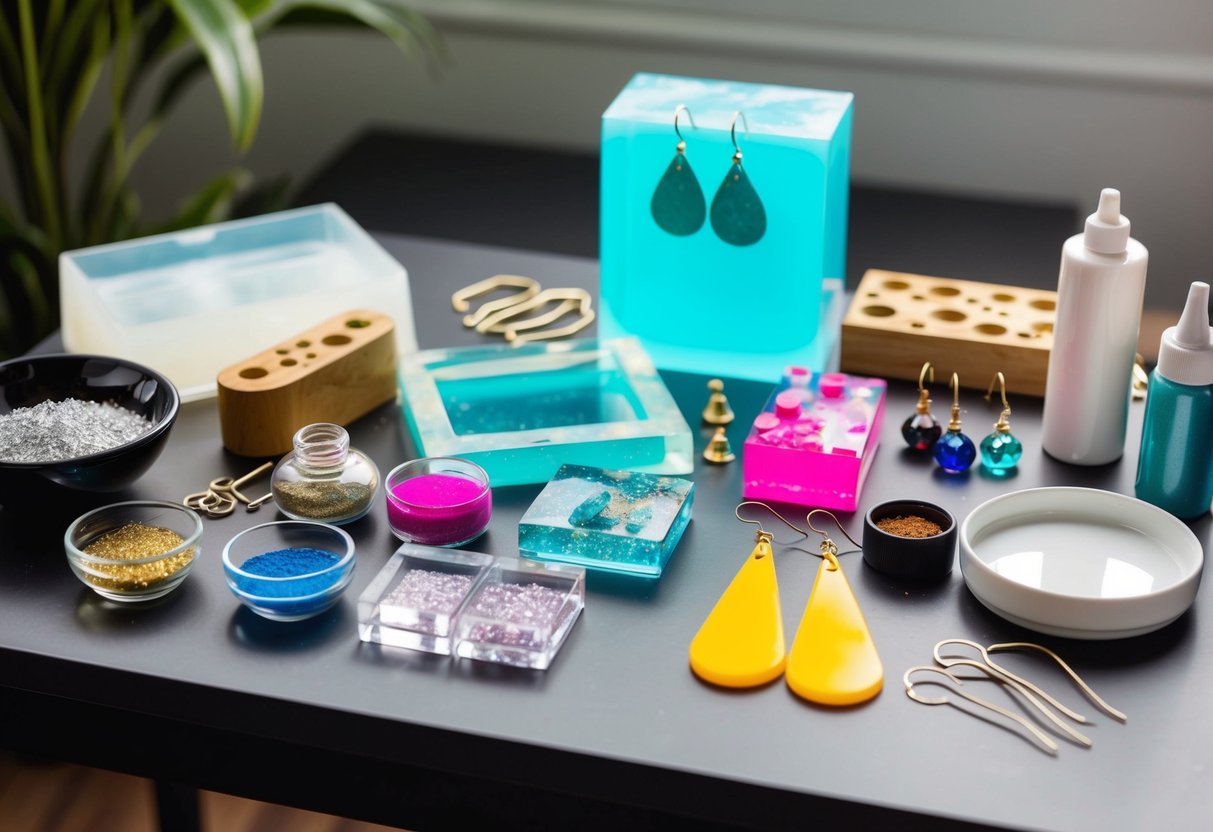
Creating resin statement earrings can be a rewarding process, blending creativity with technique. Mastering the preparation of the resin mixture ensures the foundation for high-quality pieces, while thoughtful design choices enhance the artistry of each earring.
Preparing Resin Mixture
To begin crafting resin jewelry, it is crucial to correctly combine resin and hardener. The typical ratio is often 1:1 or 2:1, as specified by the resin manufacturer. Accurate measurement is essential for achieving the right consistency and avoiding a sticky outcome.
Mix the resin and hardener thoroughly for several minutes. Stir in one direction, scraping the sides and bottom to ensure a uniform blend. It’s important to work in a well-ventilated space to handle fumes and wear gloves to protect skin from irritation. Once the mixture is free from streaks, it’s ready for pigment or inclusions, depending on the desired final look.
Designing with Resin
The design phase is an opportunity to infuse personal style into the earrings. Silicone molds are ideal, available in various shapes and sizes. Pour the mixed resin into the selected molds. Color can be added using mica powders or liquid pigments. These should be blended carefully to maintain a clean hue without air bubbles.
Consider adding embellishments such as dried flowers, glitter, or small beads to create depth and uniqueness. Placing these items in layers within the resin adds a three-dimensional aspect. Allow the resin to cure completely, which may take several hours. Patience at this stage ensures each piece stands out as a true statement.